
 Save
Save
This classic custard recipe transforms humble pantry ingredients into a silky, comforting dessert that's both elegant and nostalgic. The delicate balance of creamy texture with subtle vanilla notes makes it a perfect canvas for seasonal fruits or simply wonderful on its own.
I discovered this recipe when searching for a dessert to serve my grandmother during her last visit. The pure, simple flavor reminded her of her childhood, bringing tears to her eyes as she savored each spoonful. Now it's become our family's comfort food tradition.
Ingredients
- Whole milk: Provides the rich foundation; best results come from using full fat milk for that luxurious mouthfeel
- Large eggs: Create the perfect custard structure; use fresh eggs at room temperature for optimal results
- Granulated sugar: Sweetens without overpowering, allowing the vanilla and dairy flavors to shine
- Salt: Enhances all the flavors; even a small amount makes a remarkable difference
- Vanilla extract: Adds that classic custard flavor; splurge on pure vanilla for noticeable quality difference
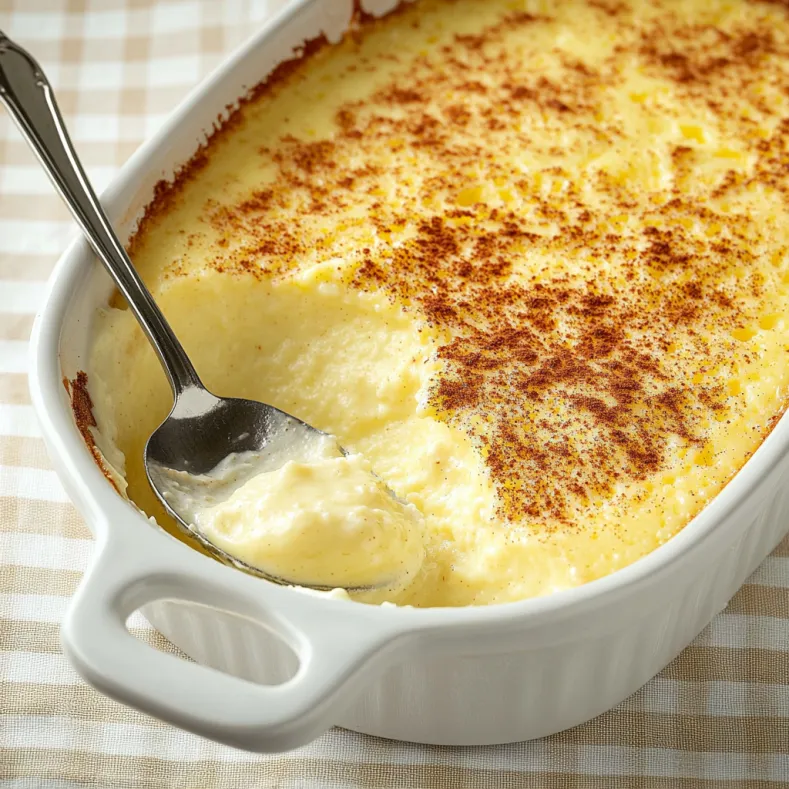
- Ground nutmeg: Contributes a warm aromatic quality that becomes the signature finish to traditional custard
Step-by-Step Instructions
- Heat the milk:
- Heat your milk in a small saucepan just until bubbles form around the edges. This scalding process helps create the perfect custard texture while ensuring the eggs set properly. Be careful not to let it come to a rolling boil as this can affect the final consistency.
- Prepare the egg mixture:
- Whisk eggs, sugar and salt together in a large bowl using gentle motions. You want them thoroughly combined but not foamy; excessive air bubbles can create an unpleasant texture in the finished custard. The mixture should look smooth and have a pale yellow color.
- Combine ingredients:
- Slowly pour the hot milk into the egg mixture while whisking constantly. This gradual tempering prevents the eggs from scrambling while creating a perfectly smooth base. The steady stream and continuous whisking are crucial for silky results.
- Strain and season:
- Pour the entire mixture through a fine mesh strainer into your baking dish. This extra step catches any tiny bits of cooked egg or milk skin that would disrupt the custard's smoothness. Sprinkle the top with nutmeg for that classic custard finish.
- Water bath baking:
- Place your custard dish inside a larger baking pan and add hot water to create a water bath. This gentle cooking method ensures even heating and prevents the custard from curdling or developing a rubbery texture. The water should come halfway up the sides of the custard dish.
- Bake to perfection:
- Bake until a knife inserted near the center comes out clean, about 55 to 60 minutes. The custard will still have a slight jiggle in the center, which is exactly what you want. This wobble indicates the perfect creamy texture that will set further upon chilling.
Vanilla is truly the soul of this recipe. I've tried replacing it with almond extract or citrus zest, but nothing compares to the pure comfort of real vanilla. My grandmother always said good custard should taste like childhood memories, and somehow that vanilla note captures exactly that feeling of nostalgic simplicity.
Perfect Pairings
Custard creates a beautiful foundation for seasonal fruit throughout the year. In summer, fresh berries provide bright contrast to the creamy base. Fall brings opportunities for poached pears or apple compote. Winter citrus segments add welcome brightness. The neutral canvas of custard welcomes nearly any fruit companion you might imagine.
Troubleshooting Tips
If your custard develops a slightly curdled appearance, it's likely that the temperature was too high during baking. Next time, ensure your water bath comes halfway up the sides of your baking dish and check that your oven temperature is accurate with an oven thermometer. Remember that custard should always bake at a gentle temperature to maintain its silky texture.
Make Ahead Magic
Custard actually improves with an overnight rest in the refrigerator, making it the perfect dessert for entertaining. The flavors meld and deepen while the texture becomes even more velvety. You can prepare it up to three days before serving, just keep it tightly covered to prevent it from absorbing refrigerator odors.
Cultural Heritage
Baked custard appears in nearly every culinary tradition around the world, from French crème caramel to Portuguese pastel de nata to Japanese purin. This version leans toward the English tradition, where nutmeg is the signature spice. This humble dessert crosses cultural boundaries because it transforms basic ingredients into something truly special.
Frequently Asked Questions About Recipes
- → What is the best type of milk to use?
Whole milk is recommended for a rich and creamy texture, but you can substitute with 2% milk if desired.
- → Why is a water bath necessary?
A water bath ensures gentle, even baking, preventing the custard from curdling or cracking.
- → Can I add different flavors to the custard?
Yes! You can experiment with flavors like almond extract or citrus zest for variation.
- → How can I tell if the custard is baked through?
Insert a knife near the center. If it comes out clean, the custard is done, but it will still jiggle slightly in the middle.
- → How long does the baked custard need to chill?
Refrigerate for at least a few hours after cooling to ensure it sets properly and is served cold.